Having no spark at the spark plugs is one of the most common reasons why a motorcycle won’t start. A no spark condition can also be one of the most frustrating starting issues on a bike. But there’s no reason why you can’t get it running again.
Remember, you need four things to make your bike run: air, fuel, spark and compression. So before we dive into the things you can check, let’s first test to make sure your motorcycle has no spark.
How to test for spark on a motorcycle
Remove your spark plug cap and wire from the spark plug by pulling it free. Using a glove to prevent a shock, touch and hold the threaded metal part of the spark plug against your engine (or any bare metal) to short the plug. Stay away from the fuel lines because FIRE…
Briefly push the starter.
You should see a bright blue or white spark. This may be difficult in daylight, so try to shield the light or do it at night. It there is no spark at all, there is a short in the system somewhere and we need to find it. If the spark is weak or orange, it is probably your coil not generating enough voltage.
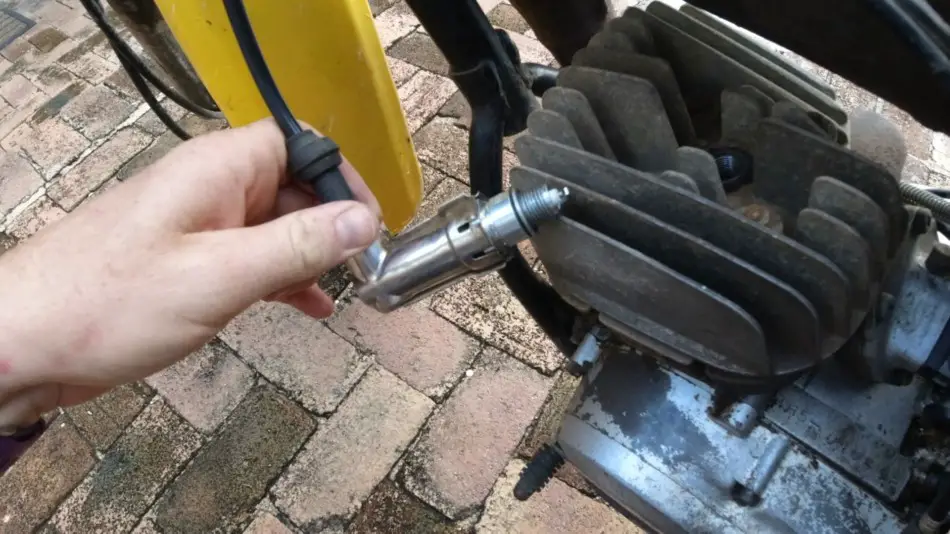
While you’re at it, make sure the spark plug hole is not full of water. That is sure to cause spark problems. If it is, remove the plug and dry it all out properly.
Okay, so we’ve confirmed your bike has no spark. What now?
Don’t start replacing parts before confirming the cause. Jumping to conclusions (because you’ve read online that your model’s CDI is prone to failure) and rushing it is the best way to NOT find the problem. Make yourself a cup of tea and clear your schedule. You need patience and an open mind to find a sparking problem. A multi-meter will also be helpful.
IMPORTANT: Test one thing at a time! The worst is if you try three things at once and the bike starts and now you have no clue what the issue was.
NOTE: If there is spark, replace your spark plug and try starting the bike again. If it still doesn’t start, the problem has to be fuel, air or compression.
Here are 11 things you can check to fix the no spark condition on your motorcycle.
#1: Ignition and kill switch switched on; safety switches off
This may seem obvious, but double check that the key is in the ON position in the ignition switch and that your kill switch is flipped to RUN. I remember pushing an old Honda MT 80 while in school until I lay next to it on the grass before realizing the kill switch is in the OFF position.
Most modern bikes have a series of safety switches that prevent you from starting your bike with the kickstand down or in gear without pulling in the clutch. If the kickstand is down, the bike won’t start unless it is in neutral. And if the bike is in gear, the clutch needs to be pulled in.
FIX: Turn the key to ON and flip the kill switch to RUN, and put the bike in neutral.
#2: Battery fully charged and terminals clean
This is such a common issue and very easily overlooked. If the battery does not have sufficient charge, it may still crank the engine over but fail to deliver a hot enough spark to start it. It may seem like the battery is fine, because the lights are on and the starter is turning.
Set the multi-meter to Voltage and measure between the positive and negative terminals on the battery. It needs to read above 12.4V but preferably closer to 12.6V. Measure at the battery terminals, but also at the wires connected to the battery. If the voltage is lower at the wires, the terminals may be dirty or not connected properly.
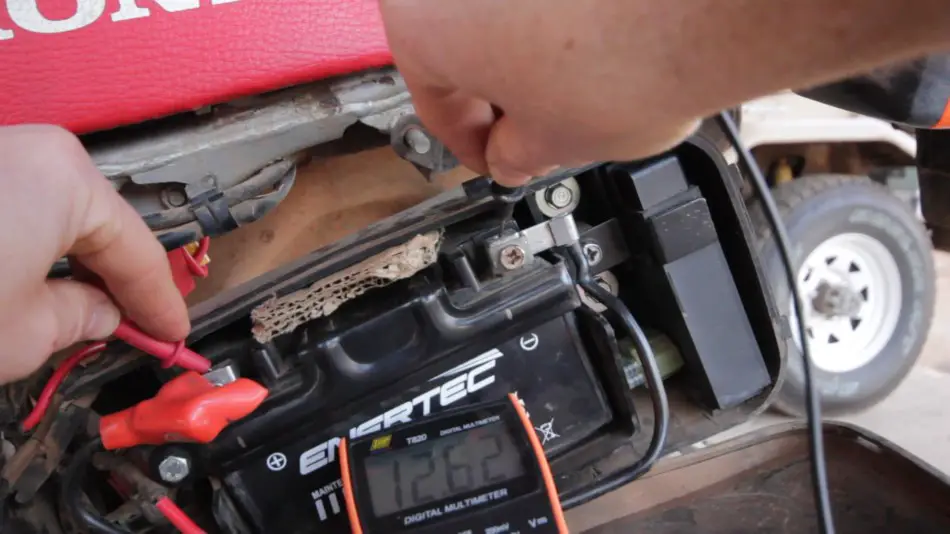
Visually inspect that the terminals are clean and free of white deposits. Dirty battery terminals will have the same effect as a flat battery. There may still be current, but not enough to give a strong spark and start the bike. This has happened to me twice and I only realized that the battery is drained after testing a whole lot of other stuff.
FIX: If the battery is lower than 12.4V, hook it up to a charger overnight or have it tested. Clean the battery terminals with a baking soda solution and sand paper while you’re at it, then apply some dielectric grease.
#3: Main fuse is in tact
While you’ve busy at the battery, check the fuses. The main fuse supplies power to the ignition system. If you don’t have a wiring diagram, just check all the fuses. The main fuse is usually a separate, bigger fuse.
FIX: Replace a burnt fuse and make sure all the fuse terminals are clean and making good contact.
NOTE: If you find a burnt fuse, you need to make sure you find the cause. There may be a short in the wiring somewhere. If you simply replace the fuse, there is a good chance it will happen again in future.
#4: Ignition, kill, and safety switches working (clutch/neutral/kickstand)
So all the switches are on, but are they working? It is common for switch terminals to get dirty over time, especially if the bike sleeps outside. While this is a simple fix, it can be intimidating to diagnose. It really helps to have a wiring diagram of your motorcycle.
The easiest way to test whether any electrical switch is working is to open up the switch housing and measure continuity between the terminals. Unplug the wires that go into the switch and use your multi-meter to test resistance. You should read 0 Ohms when the switch is in the ON position and 1 when OFF. If the reading doesn’t change when you flip the switch, it is not working properly.
Some switches, like my side-stand safety switch, have three terminals. This is where a wiring diagram comes in handy so you can trace the wires that go from the ignition switch (where the key goes) to the CDI or coil.
FIX: If you find the culprit switch, make sure it is clean inside and try again. Still no luck, well then you need to replace it. Some riders decide to by-pass their safety switches. This may not be legal in all countries, but it is an easy temporary fix to get you back home.
#5: Spark plug cap
Okay, so we’ve established that your motorcycle is getting 12 volts to where it is needed to start the sparking process. Remove the spark plug cap from the engine and the coil wire. Some caps unscrew from the coil wire, and others simply pull free. Test for resistance using your multi-meter. Anything below 5 000 Ohms is good. Above that, the resistance may be too high to let enough current pass through.

FIX: Replace the spark plug cap.
NOTE: If your bike has more than one cylinder, it may still fire if only one cylinder has no spark. But in the original spark test, you’d have to test all the plugs. If none has spark, the whole ignition system is not getting power. If only one spark plug is dead, the problem has to be closer to the plug.
#6: Ignition coil
With the ignition OFF, disconnect the spark plug wire from the coil, and remove the two smaller primary wires from the coil. Measure the resistance (with your multi-meter) between the two small terminals (the primary side) or if there is only one terminal, between the terminal and the ground (that attached to the bike’s frame). This should read between 0.5 and 3 Ohms (0.2 – 5 Ohms is also okay, but reference your bike’s service manual to be sure).
Next, test the resistance between the spark plug cap (where the spark plug goes) and the one of the coil’s smaller terminals. Again, the reading may vary and it is best to consult your motorcycle’s service manual or get the specs online. The reading should be anywhere between 5 000 and 15 000 Ohms. If the spark plug cap is still on, it will add resistance of between 5 000 and 10 000 Ohms.
FIX: If the primary or secondary resistance is outside of the acceptable range, you’ll have to replace the coil.
#7: Pick-up coil / Pulse generator / Source coil
The pick-up coil provides the timing signal for the ignition system, so if it is not working, the spark plug won’t spark and the bike won’t run. You’ll need the specifications for your motorcycle’s pick-up coil. On my Honda XR650L, I know the resistance between the two wires going to the pick-up coil should be between 423 and 517 Ohms.
Simply set your multi-meter to the 2K Ohm resistance setting and measure between the two wires. If you have the wiring diagram, you can unplug the CDI box and measure at the two terminals that go to the pick-up coil.
FIX: If the resistance is outside of the specific range, you’ll have to replace the pick-up coil. If there is no continuity (i.e. the multi-meter reads 1), there may be a broken wire on the pick-up coil which you may find by tracing the wire behind the stator cover.
#8: Capacitor discharge ignition (CDI) module
While the problem is likely to be the CDI, it does happen. Some bikes, like my Honda XR650L, are more prone to CDI failures due to poor solder joints inside. There is no way to properly test the CDI, so the only way to know for sure is to swap it out for a known good one. If that works, you’ve found your problem.
FIX: Replace the CDI. In some cases, a few wacks with a hammer will get you going again, but this is hardly a permanent solution. You can also open it up and re-solder the broken joints (a common fix on the XR).
#9: Stator
On many motorcycles, the stator provides power to charge the battery and generate the spark in the spark plug (some uses alternators). It is difficult to diagnose a failed stator, but a stator generally deteriorates over time. You may notice that the bike is hard to start, or it starts fine and then runs rough as the rpms rise. The engine may also backfire from time to time.
If you haven’t experienced any of these issues before, then it is unlikely that your stator suddenly failed. It is not impossible though and a visual inspection would be necessary. Or you can watch the Rolling Wrench on YouTube explain everything there is to know about stators.
FIX: This is probably something you want to take to a motorcycle mechanic.
#10: Conventional points ignition system needs tuning
On really old bikes with mechanical points ignitions system, regular maintenance is required to keep the bike sparking reliably. The points will wear over time which means the gap needs to be reset. The points can also get dirty, which can be cleaned with sand paper. A blown condenser may also be the cause of your no spark condition.
If you still run a bike with mechanical points, then you probably know more about bikes than I do.
Here’s a video of how I got my old 1979 Yamaha MR 50 to run again by cleaning the points:
#11: Damaged wiring
Is your bike very old and in bad shape, or did you recently drop it? If so, your problem can be that one of the wires feeding 12 volt power to your coil is damaged somewhere. This could be difficult to find, so a wiring diagram, multi-meter and a lot of Zen will required finding the fault.
Follow the power from the battery, through the ignition switch and kill switch to the CDI. If there’s 12 volt at the CDI from #4 above, then the issue has to be between the CDI and the coil. Visually inspect the wiring for damage and clean all the connectors by unplugging it, spraying it with WD40 and applying some dielectric grease.
NOTE: A wire may have internal damage, so if you find a suspect, wriggle it around while taking a reading with the volt meter. If the reading is intermittent, you’ve found the culprit.
FIX: Replace the damage section of wire or the faulty connector
Conclusion
A no spark condition can be infuriating to diagnose, but is often something obvious. The most important tool, apart from a multi-meter, is the one between your ears. Be patient, have an open mind and never jump to conclusions.
If you take it methodically and test one thing at a time, you will have your motorcycle sparking in no time.
Now go make some tea and breathe!